- Blue-Green 배포란
- Blue-Green 배포는 애플리케이션 또는 마이크로서비스의 이전 버전에 있던 사용자 트래픽을 이전 버전과 거의 동일한 새 버전으로 점진적으로 이전하는 애플리케이션 릴리스 모델입니다.
- 이전 버전을 blue 환경으로, 새 버전은 green 환경으로 부를 수 있습니다.
- AWS CLI로 진행하였으며, AWS에서 제공해주는 가이드를 참고하였습니다.
- ECS, ALB, CodedDeploy에 대한 권한이 필요합니다.
실습
1. Application Load Balancer 생성
- 블루/그린 배포 유형을 사용하는 Amazon ECS 서비스에서는 Application Load Balancer 또는 Network Load Balancer 중 하나를 사용해야 합니다. (ALB 사용)
- ALB 생성
aws elbv2 create-load-balancer \
 --name your-alb-name \
 --subnets your-subnet-01 your-subnet-02 \
 --security-groups your-secuirty-group-id \
 --region ap-northeast-2
aws elbv2 create-target-group \
 --name your-target-group-name \
 --protocol HTTP \
 --port 80 \
 --target-type ip \
 --vpc-id your-vpc-id \
 --region ap-northeast-2
aws elbv2 create-listener \
 --load-balancer-arn your-alb-arn \
 --protocol HTTP \
 --port 80 \
 --default-actions Type=forward,TargetGroupArn=your-target-group-arn \
 --region ap-northeast-2
2. Amazon ECS Cluster 생성
aws ecs create-cluster \
 --cluster-name your-ecs-cluster-name \
 --region ap-northeast-2
3. Task Definition 등록
vi farget-task.json

{
    "family": "your-task-def-name",
        "networkMode": "awsvpc",
        "containerDefinitions": [
            {
                "name": "sample-app",
                "image": "httpd:2.4",
                "portMappings": [
                    {
                        "containerPort": 80,
                        "hostPort": 80,
                        "protocol": "tcp"
                    }
                ],
                "essential": true,
                "entryPoint": [
                    "sh",
                    "-c"
                ],
                "command": [
                    "/bin/sh -c \"echo '<html> <head> <title>Amazon ECS Sample App</title> <style>body {margin-top: 40px; background-color: #00FFFF;} </style> </head><body> <div style=color:white;text-align:center> <h1>Amazon ECS Sample App</h1> <h2>Congratulations!</h2> <p>Your application is now running on a container in Amazon ECS.</p> </div></body></html>' >  /usr/local/apache2/htdocs/index.html && httpd-foreground\""
                ]
            }
        ],
        "requiresCompatibilities": [
            "FARGATE"
        ],
        "cpu": "256",
        "memory": "512",
        "executionRoleArn": "arn:aws:iam::aws_account_id:role/ecsTaskExecutionRole"
}
aws ecs register-task-definition \
 --cli-input-json file://fargate-task.json \
 --region ap-northeast-2
4. Amazon ECS Service 생성
- service-bluegreen.json 생성
{
    "cluster": "your-ecs-cluster-name",
    "serviceName": "your-ecs-service-name",
    "taskDefinition": "your-task-def-name",
    "loadBalancers": [
        {
            "targetGroupArn": "your-target-group-arnn",
            "containerName": "sample-app",
            "containerPort": 80
        }
    ],
    "launchType": "FARGATE",
    "schedulingStrategy": "REPLICA",
    "deploymentController": {
        "type": "CODE_DEPLOY"
    },
    "platformVersion": "LATEST",
    "networkConfiguration": {
       "awsvpcConfiguration": {
          "assignPublicIp": "ENABLED",
          "securityGroups": [ "your-security-group-id" ],
          "subnets": [ "your-subnet-01", "your-subnet-02" ]
       }
    },
    "desiredCount": 1
}
aws ecs create-service \
 --cli-input-json file://service-ecs.json \
 --region ap-northeast-2
aws elbv2 describe-load-balancers \
 --name your-alb-name \
 --query 'LoadBalancers[*].DNSName'

5. AWS CodeDeploy Resource 생성
- CodeDeploy Application 생성
aws deploy create-application \
 --application-nname your-application-name \
 --compute-platform ECS \
 --region ap-northeast-2
- CodeDeploy 배포 그룹을 생성할 때 사용할 2차 Target Group 생성
aws elbv2 create-target-group \
> --name your-second-target-group-name \
> --protocol HTTP \
> --port 80 \
> --tartget-type ip \
> --vpc-id "your-vpc-id" \
> --region ap-northeast-2
- 배포 그룹을 위한 deployment-group.json 생성
vi deployment-group.json

{
   "applicationName": "your-application-name",
   "autoRollbackConfiguration": {
      "enabled": true,
      "events": [ "DEPLOYMENT_FAILURE" ]
   },
   "blueGreenDeploymentConfiguration": {
      "deploymentReadyOption": {
         "actionOnTimeout": "CONTINUE_DEPLOYMENT",
         "waitTimeInMinutes": 0
      },
      "terminateBlueInstancesOnDeploymentSuccess": {
         "action": "TERMINATE",
         "terminationWaitTimeInMinutes": 5
      }
   },
   "deploymentGroupName": "your-deployment-group-name",
   "deploymentStyle": {
      "deploymentOption": "WITH_TRAFFIC_CONTROL",
      "deploymentType": "BLUE_GREEN"
   },
   "loadBalancerInfo": {
      "targetGroupPairInfoList": [
        {
          "targetGroups": [
             {
                 "name": "your-first-target-group-name"
             },
             {
                 "name": "your-second-target-group-name"
             }
          ],
          "prodTrafficRoute": {
              "listenerArns": [
                  "your-alb-listner-arn"
              ]
          }
        }
      ]
   },
   "serviceRoleArn": "arn:aws:iam::aws_account_id:role/ecsCodeDeployRole",
   "ecsServices": [
       {
           "serviceName": "your-ecs-service-name",
           "clusterName": "your-ecs-cluster-name"
       }
   ]
}
- CodeDeploy Deployment-Group 생성
aws deploy create-deployment-group \
 --cli-input-json file://deployment-group.json \
 --region ap-northeast-2
6. CodeDeploy 배포 생성
- Task Definition 새로운 버전 등록을 위한 파일 생성
vi fargate-task-green.json

{
    "family": "your-task-def-name",
        "networkMode": "awsvpc",
        "containerDefinitions": [
            {
                "name": "sample-app",
                "image": "httpd:2.4",
                "portMappings": [
                    {
                        "containerPort": 80,
                        "hostPort": 80,
                        "protocol": "tcp"
                    }
                ],
                "essential": true,
                "entryPoint": [
                    "sh",
                    "-c"
                ],
                "command": [
                        "/bin/sh -c \"echo '<html> <head> <title>Amazon ECS Sample App</title> <style>body {margin-top: 40px; background-color: #097969;} </style> </head><body> <div style=color:white;text-align:center> <h1>Amazon ECS Sample App</h1> <h2>Congratulations!</h2> <p>Your application is now running on a container in Amazon ECS.</p> </div></body></html>' >  /usr/local/apache2/htdocs/index.html && httpd-foreground\""
                ]
            }
        ],
        "requiresCompatibilities": [
            "FARGATE"
        ],
        "cpu": "256",
        "memory": "512",
        "executionRoleArn": "arn:aws:iam::account-id:role/ecsTaskExecutionRole"
aws ecs register-task-definition \
 --cli-input-json file://fargate-task-green.json \
 --region ap-northeast-2
7. CodeDeploy 모니터링
version: 0.0
Resources:
- TargetService:
Type: AWS::ECS::Service
Properties:
TaskDefinition: "your-task-def-arn"
LoadBalancerInfo:
ContainerName: "sample-app"
ContainerPort: 80
PlatformVersion: "LATEST"
aws s3 mb s3://your-s3-bucket-name
aws s3 cp ./appspec.yaml s3://your-s3-bucket-name/appspec.yaml
- CodeDeploy 배포를 위한 create-deployment.json 생성
{
    "applicationName": "your-application-name",
    "deploymentGroupName": "your-deployment-group-name",
    "revision": {
        "revisionType": "S3",
        "s3Location": {
            "bucket": "your-s3-bucket-name",
            "key": "appspec.yaml",
            "bundleType": "YAML"
        }
    }
}
aws deploy create-deployment
--cli-input-json file://create-deployment.json
--region ap-northeast-2
aws deploy get-deployment-target \
--deployment-id "your-deploy-배포-id" \
--target-id your-ecs-cluster-name:your-ecs-service-name \
--region ap-northeast-2

{
    "deploymentTarget": {
        "deploymentTargetType": "ECSTarget",
        "ecsTarget": {
            "deploymentId": "d-146P8PJ98",
            "targetId": "dyyeom-ecs-cluster:dyyeom-ecs-service",
            "targetArn": "arn:aws:ecs:ap-northeast-2:account-id:service/dyyeom-ecs-cluster/dyyeom-ecs-service",
            "lastUpdatedAt": "2024-10-28T01:52:58.971000+00:00",
            "lifecycleEvents": [
                {
                    "lifecycleEventName": "BeforeInstall",
                    "startTime": "2024-10-28T01:50:32.799000+00:00",
                    "endTime": "2024-10-28T01:50:32.993000+00:00",
                    "status": "Succeeded"
                },
                {
                    "lifecycleEventName": "Install",
                    "startTime": "2024-10-28T01:50:33.115000+00:00",
                    "endTime": "2024-10-28T01:52:56.215000+00:00",
                    "status": "Succeeded"
                },
                {
                    "lifecycleEventName": "AfterInstall",
                    "startTime": "2024-10-28T01:52:56.338000+00:00",
                    "endTime": "2024-10-28T01:52:56.587000+00:00",
                    "status": "Succeeded"
                },
                {
                    "lifecycleEventName": "BeforeAllowTraffic",
                    "startTime": "2024-10-28T01:52:56.987000+00:00",
                    "endTime": "2024-10-28T01:52:57.190000+00:00",
                    "status": "Succeeded"
                },
                {
                    "lifecycleEventName": "AllowTraffic",
                    "startTime": "2024-10-28T01:52:57.315000+00:00",
                    "endTime": "2024-10-28T01:52:58.123000+00:00",
                    "status": "Succeeded"
                },
                {
                    "lifecycleEventName": "AfterAllowTraffic",
                    "startTime": "2024-10-28T01:52:58.572000+00:00",
                    "endTime": "2024-10-28T01:52:58.838000+00:00",
                    "status": "Succeeded"
                }
            ],
            "status": "Succeeded",
            "taskSetsInfo": [
                {
                    "identifer": "ecs-svc/8386033818342024468",
                    "desiredCount": 1,
                    "pendingCount": 0,
                    "runningCount": 1,
                    "status": "ACTIVE",
                    "trafficWeight": 0.0,
                    "targetGroup": {
                        "name": "dyyeom-cicd-tg"
                    },
                    "taskSetLabel": "Blue"
                },
                {
                    "identifer": "ecs-svc/8455803795240805734",
                    "desiredCount": 1,
                    "pendingCount": 0,
                    "runningCount": 1,
                    "status": "PRIMARY",
                    "trafficWeight": 100.0,
                    "targetGroup": {
                        "name": "dyyeom-cicd-tg-02"
                    },
                    "taskSetLabel": "Green"
                }
            ]
        }
    }
}
실패했을 경우 Falied 표시가 나타남
{
    "deploymentTarget": {
        "deploymentTargetType": "ECSTarget",
        "ecsTarget": {
            "deploymentId": "d-EG8M4LJ98",
            "targetId": "dyyeom-ecs-cluster:dyyeom-ecs-service",
            "targetArn": "arn:aws:ecs:ap-northeast-2:account-id:service/dyyeom-ecs-cluster/dyyeom-ecs-service",
            "lastUpdatedAt": "2024-10-28T01:49:34.415000+00:00",
            "lifecycleEvents": [
                {
                    "lifecycleEventName": "BeforeInstall",
                    "startTime": "2024-10-28T01:49:33.529000+00:00",
                    "endTime": "2024-10-28T01:49:33.795000+00:00",
                    "status": "Succeeded"
                },
                {
                    "lifecycleEventName": "Install",
                    "startTime": "2024-10-28T01:49:33.936000+00:00",
                    "endTime": "2024-10-28T01:49:34.261000+00:00",
                    "status": "Failed"
                },
                {
                    "lifecycleEventName": "AfterInstall",
                    "status": "Skipped"
                },
                {
                    "lifecycleEventName": "BeforeAllowTraffic",
                    "status": "Skipped"
                },
                {
                    "lifecycleEventName": "AllowTraffic",
                    "status": "Skipped"
                },
                {
                    "lifecycleEventName": "AfterAllowTraffic",
                    "status": "Skipped"
                }
            ],
            "status": "Failed",
            "taskSetsInfo": [
                {
                    "identifer": "ecs-svc/8386033818342024468",
                    "desiredCount": 1,
                    "pendingCount": 0,
                    "runningCount": 1,
                    "status": "PRIMARY",
                    "trafficWeight": 100.0,
                    "targetGroup": {
                        "name": "dyyeom-cicd-tg"
                    },
                    "taskSetLabel": "Blue"
                }
            ]
        }
    }
}
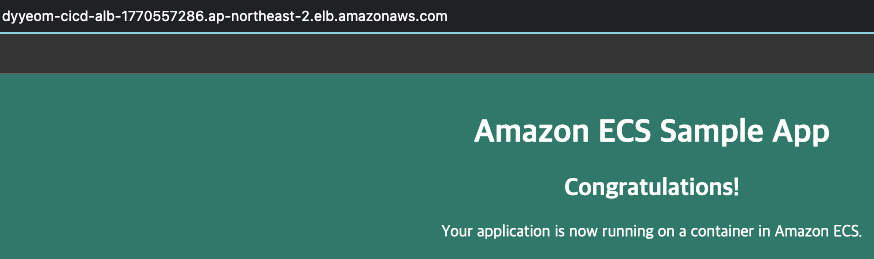
8. Green 배포 확인